
HOW TO REMOVE EVERY TYPE OF STAIN: THE COMPLETE A-Z REFERENCE GUIDE
The definitive professional manual for preserving fabrics, carpets, and surfaces
How to Remove Every Type of Stain: The Complete A-Z Reference Guide
1. Introduction
Stains are inevitable. Whether it is red wine on a white sofa, coffee on a new carpet, or grass stains on favorite trousers, every homeowner faces that moment of panic. The visual impact of a spill can be distressing, especially when it involves premium fabrics or expensive upholstery. However, the difference between a temporary accident and a permanent eyesore lies entirely in the response strategy. The good news is that almost every stain can be removed if you act quickly and use the right technique. The bad news: using the wrong method can set the stain permanently, bonding the pigment to the fibers in a way that even professional-grade solvents cannot undo.
This A-Z reference guide is designed to be your comprehensive manual for home preservation. It covers the most common stains encountered in a modern household, detailing exactly what works for each substance and, crucially, what to NEVER do. By understanding the chemistry of different stains—from proteins to tannins and oils—you can approach every spill with the calm authority of a professional cleaner. Bookmark this page; it is your first line of defense against spills, splatters, and accidents that threaten the aesthetic integrity of your home.
2. The Golden Rules of Stain Removal (Read This First!)
Before diving into specific substances, you must internalize the fundamental principles of stain science. Following these rules will increase your success rate by over 80%.
- Act fast: Fresh stains are 10x easier to remove than set-in stains. Once a substance dries and oxidizes, it begins a chemical bond with the material.
- Always blot, never rub: Rubbing is the most common mistake. It spreads the stain horizontally and pushes the particles deeper into the fibers or pores of the surface. Always use a clean white cloth to blot.
- Test first: Always test any cleaning solution—even natural ones—on a hidden, inconspicuous area first to check for colorfastness or surface damage.
- Work from the outside in: Start at the edges of the spill and move toward the center. This prevents the “halo effect” where the stain spreads outward during the cleaning process.
- Cold water for proteins: Use cold water for protein-based stains like blood, dairy, or eggs. Hot water “cooks” the protein, causing it to coagulate and bind permanently to the fabric.
- Warm water for oils: Use warm water for oil-based stains such as grease, butter, or makeup to help break down the lipids.
- Patience is key: Some complex stains require multiple treatments. Do not rush the process by using harsher chemicals; repeat the gentle method until the pigment is gone.
3. The Complete A-Z Stain Removal Guide
3.1 A — Blood
COLD WATER ONLY. Hot water bakes the protein into the fabric. For fresh stains, soak the item in cold salt water for 30 minutes. If the stain persists, rub with hydrogen peroxide (3%) directly on the area. Let it foam—this reaction lifts the organic matter to the surface—then blot. Repeat until the red pigment is gone. For delicate fabrics like silk or wool, use a diluted enzyme cleaner specifically formulated for proteins.
3.2 A — Coffee and Tea
Blot excess liquid immediately with a white towel. Mix 1 tablespoon of white vinegar with 2 cups of water. Apply the solution, blot, and repeat. For set-in stains on carpets, make a paste of baking soda and vinegar; apply it to the area, let it dry completely, and then vacuum. To remove stubborn coffee rings in ceramic mugs, rub with a paste made of baking soda and a small amount of water.
3.3 B — Butter, Grease, and Oil
Sprinkle cornstarch or baking soda immediately to absorb excess oil. Let it sit for 15 minutes, then brush off. Apply a concentrated dish soap (blue Dawn is highly recommended by professionals) directly to the stain and gently work it in with your fingers. Let it sit for 5 minutes before washing in the hottest water the fabric care label allows. This is a critical step in your complete room-by-room deep cleaning checklist.
3.4 C — Chewing Gum
The goal is to HARDEN FIRST. Apply an ice cube directly to the gum until it becomes brittle. Use a dull butter knife to crack and scrape off the hardened pieces. If any sticky residue remains, apply rubbing alcohol or a small amount of WD-40 to a cotton ball and blot the area until the adhesive dissolves.
3.5 C — Chocolate
Scrape off any excess solid chocolate carefully. Apply a mixture of one part dish soap and one part hydrogen peroxide. Let the solution sit for 10 minutes to break down the fats and sugars. Gently rub the area and rinse with cold water. For older, set-in chocolate stains, an enzyme-based laundry pre-treater is necessary to digest the organic components.
3.6 D — Dirt and Mud
Counter-intuitively, you must let mud dry completely before treating it. Brushing wet mud only pushes it deeper. Once dry, brush off the crust with a stiff brush or vacuum. Apply a dish soap solution, gently rub, and rinse. For stubborn dirt on clothing, soak the garment in oxygen bleach (such as OxiClean) for 30 minutes before a standard wash cycle.
3.7 E — Egg
Scrape off excess solids. Soak the fabric in cold water with an enzyme detergent for at least 30 minutes. Do NOT use hot water, as eggs are pure protein and will cook into the fibers. After the soak, wash in cold water. This protocol is essential for maintaining eco-friendly cleaning standards when avoiding harsh solvents.
3.8 G — Grass
Pre-treat the area with rubbing alcohol applied directly to the stain. Let it sit for 10 minutes to break down the chlorophyll. Apply liquid laundry detergent and gently rub the fibers together. Wash in warm water. For stubborn grass marks, make a paste of baking soda and hydrogen peroxide, apply it for 20 minutes, and rinse thoroughly.
3.9 I — Ink (Pen and Marker)
Place a paper towel under the fabric to catch the bleeding ink. Apply rubbing alcohol to the stain using a cotton ball; the ink will transfer to the paper towel below. Change the paper towel frequently to avoid re-depositing ink. For ballpoint pen on sturdier fabrics, high-alcohol hairspray can be effective—spray heavily, blot, and repeat until the pigment vanishes.
3.10 J — Juice (Fruit Juice)
Rinse immediately with cold water from the back of the fabric. Apply white vinegar to neutralize the natural acids and sugars. Rinse again. For set-in fruit stains on white fabrics, apply lemon juice and leave the item in direct sunlight; the UV rays will act as a natural, gentle bleach.
3.11 K — Ketchup and Tomato Sauce
Scrape off excess sauce. Apply cold water from the back of the stain to push the particles out of the fibers rather than through them. Apply a mixture of dish soap and white vinegar. Let it sit for 15 minutes before rinsing. For older stains, an oxygen-based bleach is the most effective solution.
3.12 M — Makeup (Foundation, Lipstick, Mascara)
For liquid foundation, shaving cream is surprisingly effective; apply, rub gently, and rinse. For lipstick, which is wax-based, apply petroleum jelly or coconut oil to dissolve the wax, followed by dish soap to remove the oil. For mascara, use rubbing alcohol on a cotton ball to blot the pigment before washing.
3.13 M — Mold and Mildew
Create a solution of 1 part hydrogen peroxide to 2 parts water. Spray on the mold stain and let it sit for 30 minutes to kill the spores. Scrub with a soft brush and rinse. For grout, steam cleaning combined with a baking soda paste is the professional standard for restoration.
3.14 M — Mustard
Mustard contains turmeric, a powerful natural dye. You must act fast. Apply glycerin or rubbing alcohol to dissolve the pigment. Let it sit for 15 minutes, then apply dish soap and gently rub. Rinse with cold water. Avoid any heat or hot water until the yellow stain is completely gone, or it will become permanent.
3.15 P — Paint
For water-based (latex/acrylic) paint, flush with cold water immediately and rub with dish soap. For oil-based paint, you must use mineral spirits or turpentine on a cloth to blot the area, then wash with dish soap to remove the solvent. If paint has dried, rubbing alcohol can sometimes soften it enough for mechanical removal.
3.16 P — Perspiration and Sweat
Make a paste of 4 tablespoons of baking soda and 1/4 cup of water. Apply to the yellowed areas and let sit for 30 minutes before washing in cold water. For heavy yellowing on white shirts, apply hydrogen peroxide directly, let it sit for 30 minutes, and wash with oxygen bleach to restore brightness.
3.17 R — Red Wine
Blot immediately. Cover the stain with a thick layer of salt to absorb the liquid; the salt will turn pink as it works. After 10 minutes, brush off the salt. Cover any remaining pigment with a baking soda paste, let it dry, and vacuum. For lingering shadows, apply a mixture of hydrogen peroxide and dish soap. Interestingly, pouring white wine over a red wine stain can also help neutralize the pigment before blotting.
3.18 R — Rust
Rust requires an acid to dissolve the iron oxide. Apply lemon juice directly to the stain and sprinkle with salt. Let the item dry in direct sunlight, then rinse. NEVER use chlorine bleach on rust; it causes a chemical reaction that intensifies the stain and makes it permanent.
3.19 S — Sauce (Pasta, BBQ, Soy)
Scrape excess and flush with cold water from the back. Pre-treat with a degreasing dish soap and let sit for 10 minutes. For tomato-based sauces, add a splash of white vinegar to the soap to help break down the acidity. This is a key part of maintaining a 15-minute daily cleaning routine for busy professionals—handling small spills before they become deep cleaning projects.
3.20 S — Scorch Marks
For light scorch marks from an iron, make a paste of hydrogen peroxide and baking soda. Apply to the cooled fabric, let sit for 30 minutes, and rinse. For white cotton, soaking in diluted hydrogen peroxide for an hour can lift the yellowing. Note: if the fabric has turned dark brown or black, the fibers are physically burned and the damage is permanent.
3.21 U — Urine (Human and Pet)
Blot excess liquid. Apply an enzyme cleaner (such as Nature’s Miracle) to break down the uric acid crystals—this is the only way to truly remove the odor and prevent pets from re-marking. For carpets, cover the area with baking soda after the enzyme treatment, let it dry, and vacuum. For set-in stains, use a mixture of hydrogen peroxide, baking soda, and a drop of dish soap.
3.22 V — Vomit
Scrape off solids and flush with cold water. Use the same enzyme cleaner protocol as used for urine. Apply baking soda to absorb remaining moisture and odors. Once dry, vacuum the area. A final rinse with a white vinegar solution will help neutralize any lingering acidic smells.
3.23 W — Wax (Candle Wax)
Harden the wax with ice cubes in a plastic bag. Crack and peel off the bulk of the wax. Place a brown paper bag or several paper towels over the remaining residue. Run a warm iron (low heat) over the paper; the wax will melt and be absorbed by the paper. Repeat with fresh paper until no more oily spots appear.
4. The Emergencies Only Toolkit
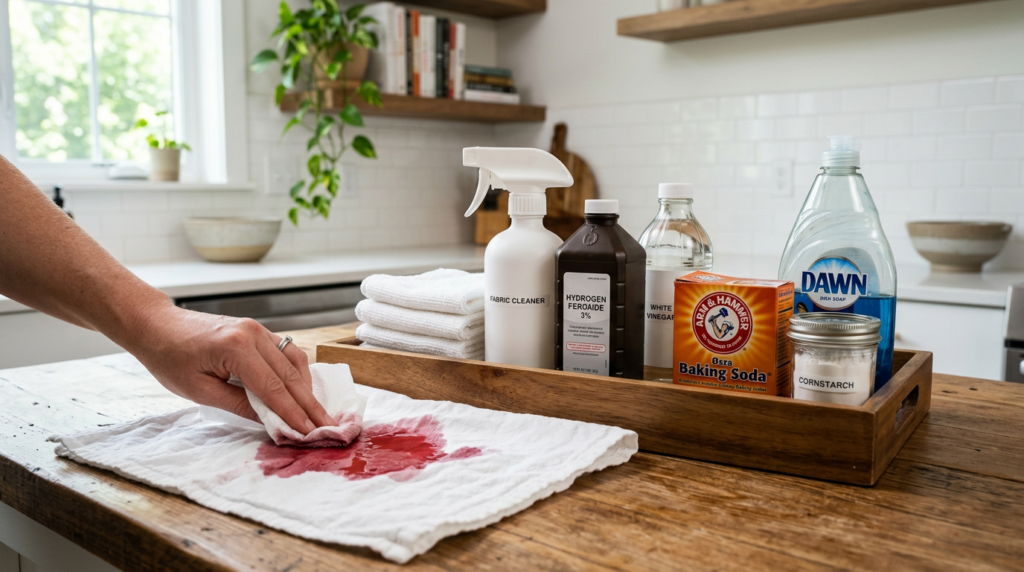
To respond effectively to stains, every premium home should have a dedicated “spotting kit” ready for immediate use. Store these 10 essentials in a single caddy:
- Hydrogen peroxide (3%): For organic stains and blood.
- White vinegar: To neutralize odors and cut through sugars/tannins.
- Baking soda: For absorption and gentle abrasion.
- Blue dish soap (Dawn): The gold standard for grease and oil.
- Rubbing alcohol: For ink, grass, and makeup.
- Cornstarch: To pull oil out of delicate fabrics and carpets.
- Enzyme cleaner: Essential for urine, vomit, and blood.
- Oxygen bleach (OxiClean): For safe, non-chlorine brightening.
- Clean white cloths: To prevent dye transfer during blotting.
- Spray bottle: For mixing custom solutions on the fly.
5. What to NEVER Do (Common Mistakes)
Professional restoration often fails not because of the stain itself, but because of the homeowner’s initial “rescue” attempts. Avoid these critical errors:
- Never use bleach on protein stains: Bleach reacts with proteins (blood, sweat, milk) and can turn them permanently yellow or brown.
- Never rub: As stated, rubbing destroys fabric texture and pushes the stain deeper.
- Never use hot water on unknown stains: If you aren’t sure what it is, start with cold. Heat sets more stains than it helps.
- Never iron over a stain: The high heat of an iron acts as a catalyst that bonds the stain to the fiber permanently.
- Never treat silk or wool like cotton: These are protein fibers; they require specialized, pH-neutral cleaners.
- Never mix bleach with ammonia or vinegar: This is a safety rule. Mixing these creates toxic chlorine or chloramine gas, which is lethal in enclosed spaces.
6. When to Call a Professional
While most household accidents are manageable, some scenarios require industrial-grade intervention. You should contact a professional service if you encounter:
- Large-scale red wine spills on expensive or light-colored carpets.
- Set-in stains on delicate silk, antique upholstery, or dry-clean-only garments.
- Significant ink or dye transfer on leather furniture.
- Water damage or deep-set biological stains on mattresses.
- Mystery stains that do not respond to basic blotting and cold water.
Professional cleaners utilize specialized spotting boards, high-pressure steam extraction, and a library of chemical solvents not available to the general public. For expatriates living in Poland who require high-end maintenance services, refer to our expat guide to premium home maintenance in Warsaw for vetted professional recommendations.
7. Conclusion
Stains are a fact of life, but a ruined piece of clothing or a permanent carpet blemish does not have to be. With this A-Z guide, you now have professional-grade knowledge at your fingertips. The key to successful home care is a combination of speed, the correct chemical approach, and the patience to see the process through. Remember the core mantra: blot, do not rub; use cold water for proteins; and always test your solution first. Bookmark this guide today—you never know when the next spill will happen, and being prepared is the best way to keep your home sparkling.
About the Author: Pedro Neto is a freelancer and an enthusiast of practical daily solutions. With a keen eye for efficiency and organization, Pedro shares on sparklinghomecare.com the best strategies and techniques to transform the home care routine into something simple, fast, and high-impact.
Disclaimer: This article provides general guidance on stain removal. Always test any method on a small, hidden, inconspicuous area first. The effectiveness of stain removal depends on fabric type, stain age, and surface material. Follow manufacturer care instructions for clothing and furniture. The author is not responsible for damage resulting from the use of these methods.